Last Line No Longer Available is a common issue faced by a lot of iPhone 13 and iOS 15 users. If you are facing this issue on your Apple device then you are not alone.
In this article, we will take a look at some practical tips that will help us to fix the Last line no longer available error on iPhone 13. Go through the troubleshooting tips and get it fixed easily.
Although the error is common in iPhone 13 devices, a lot of iOS 15 users are also facing the same issue. The issue arises on iPhones with support for two sims. Below given are the iPhones suffering from this problem.
- iPhone XR
- iPhone XS, XS Max
- iPhone 11, 11 Pro, 11 Pro Max
- iPhone 12, 12 mini, 12 Pro, 12 Pro Max
- iPhone 13, 13 mini, 13 Pro, and 13 Pro Max
How to Fix Last Line No Longer Available on iPhone in 2026
Since we are not sure about the root cause of this error, you may want to try multiple methods given below to solve the issue. Go through the tips given below and see which one is working for you.
1. Clear Call Log
Some people have managed to fix the Last Line No Longer Available error on their iPhones by clearing the recent call log. It is not guaranteed that clearing the call log will fix the problem but it is worth giving a try.
Do keep in mind that clearing the recent call log will permanently erase all the call history and you won’t be able to access it in the future. If there are any unsaved numbers, make sure to save them before clearing the call log.
In order to clear the Recent Call Log, follow the steps given below:
- Open the Phone app
- Go to Recents > Edit
- Now tap on the Clear button and select Clear All Recents.

This will erase the recent call log from your iPhone.
Take a look at call recorder apps for iPhone that will let you record any phone calls.
2. Turn on/off Airplane Mode
The airplane mode on your smartphone has got some magical powers. Whether it be Android or iOS, enabling and disabling the airplane mode can actually solve a lot of network-related issues. For the same reason, if there is a glitch with the mobile network then fiddling with airplane mode might help us to fix the Last Line No Longer Available error.
Enabling Airplane mode in iPhone is very easy.
Open Control Center (swipe down from the top right corner of the screen).
Tap on the Airplane mode icon to instantly enable it
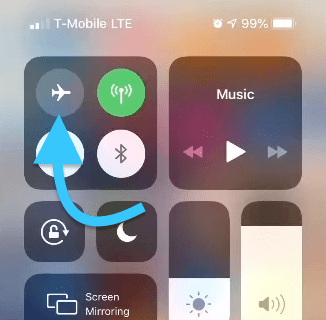
Wait for a few seconds and tap on the same icon to disable Airplane mode.
Again wait for some time until the phone finds the network and now try making a call and see if the issue is solved.
3. Restart your iPhone
Restarting your iPhone will clear the cache and temporary files. This can help you in fixing the Last Line No Longer Available error. Turning your iPhone off and then turning it on the back again can solve a lot of iOS system-related issues. So it is worth giving this method a try.
The point here is to just restart your iPhone and see if it fixes the issue or not.
Follow the steps given below to force restart your iPhone.
iPhone 6 or earlier
Hold both the power button and the home button together until the Apple logo shows up.
iPhone 7 and 7 Plus
Press and hold both the power button and volume down button simultaneously until the Apple logo shows up.
iPhone 8 or later
Press the volume up button and quickly press the volume down button. Now hold the power button until the Apple logo shows up.
If you do not want to force restart the iPhone then you may perform a normal restart on your iPhone as well.
4. Re-insert SIM Card
If the issue you are facing is with the physical SIM card then you may try removing and re-inserting the card. You are advised to perform this step if:
- You use only a single SIM card in your iPhone
- Default line for calls and messages is your physical SIM card
Use the SIM ejector tool to pull out the SIM tray and remove the SIM card. Now wipe off dust if any and re-insert it back to the slot. Wait for some time for the phone to detect signal and you are all good to go.
5. Switch between SIMs
iOS gives us the option to change the SIM for calling purposes even if you have set a default line for calls and messages. If the issue still persists, then you may try switching between the SIMs to fix the issue.
Refer to the steps given below to switch between SIMs.
- If you are about to manually type and dial a number then tap on the primary mobile number and select the alternet SIM.
- If you are about to call to a saved number then tap on the i button next to the contact and tap on your default number. Now tap on the alternate number to make a call from the other number.
6. Reset Network Settings
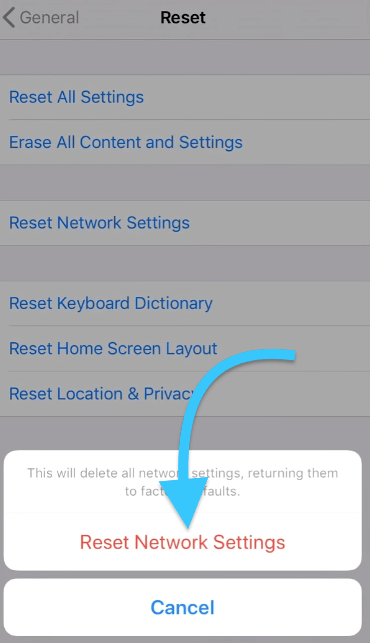
Resetting network settings can sometime help you to fix the issue related to Last Line No Longer Available on your iPhone. Resetting the network settings is as easy opening Settings and resetting network settings.
Go to Settings > General > Transfer or Reset iPhone > Reset and select the ‘Reset Network Settings’ from the popup menu.
7. Update Carrier Settings
There is a chance that the Last Line No Longer Available issue is something related to the Carrier settings. An easy fix to this is to update carrier settings. To see if the update is available or not, follow the step given below.
- Open Settings
- General > About
- If you find a carrier update there then tap on the Update button and complete the updation process.
Once updated, your carrier settings will be updated to the latest version.
8. Take your iPhone to the nearest Apple Store
If none of the tips/methods given above worked for you then the better idea would be to take the device to a nearest Apple Store. If the issue is something related to the hardware that there is little to nothing that we can do about it. If this is the case, then the only viable option is to take the iPhone to an authorized Apple service center.
If your device is still under warranty then make sure not to take it to any unauthorized service center as it might void the warranty.
Fix Last Line No Longer Available in iOS 15 and above
These are some of the easy-to-try troubleshooting methods that you can employ to fix Last Line No Longer Available error on iPhone. The error is most prominently seen on iPhone 13 and devices running iOS 15 or later versions. If none of the methods mentioned above worked for you then take your iPhone to a nearest Apple service center and they will figure out the issue and fix it for you.


