
Telnet might be an outdated project but a lot of people still use it in 2026. Even the latest version of Windows 11 comes with Telnet in it. As you might have noticed, it is disabled by default. But the good news is that you can enable Telnet in Windows 11 in a few easy steps.
Here in this article, you will find how to install and enable Telnet clients in Windows 11 and Windows Server 2022. Telnet client application is a program that uses standard TCP/IP protocol. It is used to remotely connect with another computer. Even today, a lot of people use Telnet to test remote SQL connections, etc.
As I mentioned earlier, Telnet is a bit outdated and unsecured when compared with the latest SSH protocol. Almost everyone has moved to the better tech with more security. But, if you still want to use Telnet on Windows 11, this article got you covered.

How to install Telnet in Windows 11?
Like I said, Telnet is already there in Windows 11 but disabled by default. If a user needs to enable Telnet, Windows 11 got an option for the same. Follow the steps given below to easily enable and activate Telnet on Windows 11.
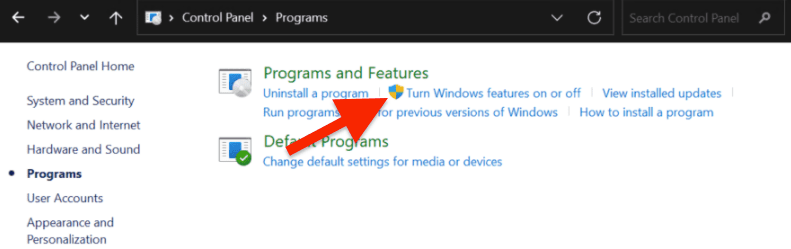
Step 1: Head over to the search bar and type “Control Panel“. Click on the Control Panel option to open it up.
Step 2: Click on the Programs category from the homepage of the Control Panel. Under Programs and Features, click on Turn Windows features on or off.
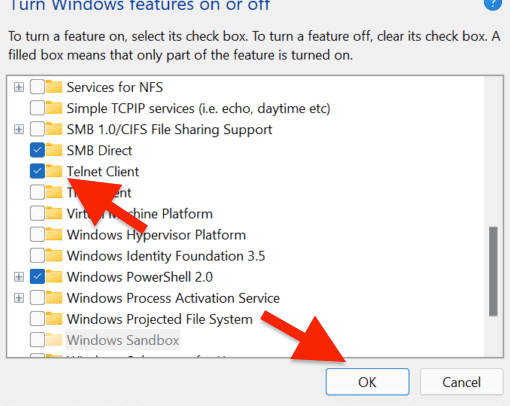
Step 3: A popup will appear with a list of some Windows features. Next to every feature, you will also find a check box.
All you have to do is scroll down and find the option “Telnet Client“. Tick on the checkbox and click on the OK button.
That’s it. We have successfully enabled Telnet on our Windows 11 computer. This is by far the easiest method to enable Telnet on Windows. For some reason, if you’re not able to find Telnet client in this section then follow the next method to install Telnet on Windows 11.
If you are new to Windows here’s the list of all keyboard shortcuts in Windows 11 and a guide to disabling S mode.
How to install Telnet via PowerShell or CMD
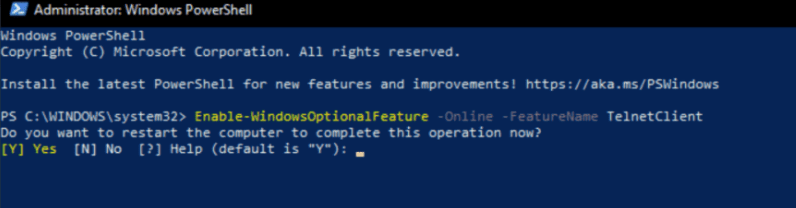
In this method, we will use PowerShell to install and enable Telnet on Windows 11. Installing Telnet on Windows 11 is as simple as running a single line command on Windows PowerShell.
Refer to the steps given below to install and activate Telnet on Windows 11.
- Open Windows search and type PowerShell. From the list of options, click on Windows PowerShell and open it up.
- Copy the command given below and paste it in the Windows Powershell command window. Now hit enter to exectue the command.
Install-WindowsFeature -name Telnet-Client
This way you can easily install Telnet on Windows 11.
Similar to PowerShell, we may also use a command prompt to install Telnet on Windows 11. You will have to use a separate command for installing Telnet via command prompt or CMD in Windows 11.
Install Telent on Windows 11 via CMD
- Open windows search and type CMD. Find command prompt and right click on the same. Select the option Run as administrator.
- Paste the command given below on CMD and hit enter. Wait for a few seconds until it will get installed on your computer. It will be activated as well.
dism /online /Enable-Feature /FeatureName:TelnetClient
Installing Telnet on Windows 11
This is how easy it is to enable Telnet on Windows 11. Even though Telnet is outdated, it is still available on Windows 11. By default, Telnet is disabled in Windows 11 but it can be enabled in a few clicks. Basically, there are three methods to enable Telnet on Windows 11. The very first one is to go to Control Panel and enable it from there. Or if you want to use a command to enable Telnet, the same is available as well.
You can enable Telnet using both Windows PowerShell and CMD (Command Prompt). The command for both PowerShell and CMD is different, so keep that in mind. I have mentioned all necessary commands to enable Telnet in this article itself. You can use the same in other versions on Windows like Windows 10 as well.