
It’s finally time to mod the full release version of Baldur’s Gate 3!
This modding tutorial will specifically cover using Vortex, the Nexus Mod Manager, as I’ve personally found it the easiest to use for modding BG3 after trying different methods.
There is another dedicated BG3 mod manager available called Mod Manager, and you can also do the manual mod installation by extracting files directly into the game folder. However, I’ve tried all three options extensively, and Vortex has given me the smoothest experience overall.
Please note that modding BG3 is still in the early days, and the game is frequently being patched, so install mods with caution, as sometimes things may not work right after a patch or hotfix until the mod is updated for compatibility. It’s an ongoing process as the game develops.
This guide for modding BG3 with Vortex will work for both GOG and Steam installations.
Before you begin modding, please load into BG3 at least once and play for a few minutes to ensure everything has loaded properly. Some mods may not initialize correctly otherwise.
At the end, I’ll also share a few tips and tricks I’ve learned to help with modding this game after hours of trial and error.
Take a look at top BG3 tricks and tips to take your gameplay to the next level.
Step 1: Install Vortex
The first step in the process is to get Vortex fully installed on your system. Vortex is a free and popular mod manager made by Nexus Mods, who host a huge modding community.
Once Vortex is fully installed, make sure you log into your Nexus Mods account inside Vortex.
There’s an option to sign in or create an account in the upper right-hand corner.
Connecting your account allows you to download mods directly from Nexus websites into Vortex with one click.
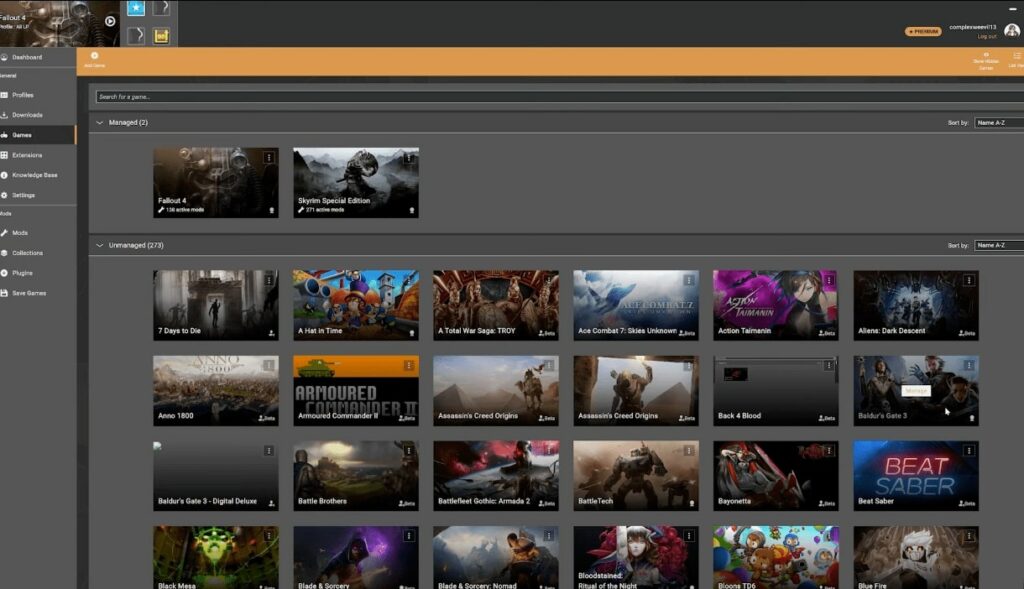
Step 2: Add BG3 to Vortex
Next, you’ll need to add Baldur’s Gate 3 to Vortex itself, so the program recognizes it as a game you want to mod.
The easiest way to do this is to click the “Games” button located on the vertical menu bar on the left hand side of Vortex. This will open up a full list of all supported games.
You should see two sections – one for unmanaged games, and one for any games currently linked and managed by Vortex.
Scroll through the unmanaged games list alphabetically to find Baldur’s Gate 3.
Before you hit the “Manage” button in the center to link BG3, I’d suggest clicking the three little dots in the upper right hand corner of the BG3 entry. Here, double check that the detected game folder location is pointing to the correct install folder on your system.

If, for some reason, it’s not detecting the right location, use the “Manually select folder” option to direct Vortex to the proper Baldur’s Gate 3 game folder instead. This is usually under Program Files for GOG or SteamApps for Steam.
Once you’ve ensured it’s pointing at the correct BG3 install folder, go ahead and click the “Manage” button in the center to add it to Vortex.
Vortex will now do some setup on its end, including installing a modding framework it needs. You’ll see a pop-up prompt to install a tool called Modding Toolkit / LSlib – go ahead and allow Vortex to install this for you.
Step 3: Install Your First Mods
Now that your BG3 is fully linked with Vortex, it’s finally time to start downloading and installing some mods!
I cannot stress enough that before you begin fully modding BG3, it’s highly recommended to install either the Full Release Mod Fixer or Patch 3 Mod Fixer mods. Both basically serve the same purpose – making mods more compatible with the latest version of BG3.
Personally, I went with the Full Release Mod Fixer since it seemed the most comprehensive.
To install, simply use the “Mod Manager Download” button on Nexus Mods, which detects Vortex and downloads the mod directly into it. If your browser prompts you, allow it to open up Vortex.
You’ll then see the Fixer mod downloading right into your mod manager.
Alternatively, you can also drag and drop the zipped mod file from your desktop directly into Vortex if you prefer.
Just click into the “Mods” section (left sidebar), and drag the zip file anywhere into the bottom window area where you’ll see the prompt “Drop files here to install”.
Either way, once the Fixer mod download completes, you’ll see it appear in the Mods section within Vortex, listed as “Never Installed”.
Click on the entry to select it.
Then on the right side, make sure the mod is checked as “Enabled” – this means it will be installed. Initially, mods show as disabled by default.
You’ll also notice in the upper right corner popup prompts guiding you to install and enable any new mods. You can just click these prompts too as they accomplish the same thing.
Step 4: Check Load Order and Deploy
Before loading into the game to check out your new mods, there are a couple of quick steps I recommend taking.
First, click on the “Load Order” button, which is located in the vertical menu bar on the left, right underneath the Mods section.
Here you can see all your enabled mods listed in the order they will load into the game. You can also manually drag the entries to rearrange them as needed.
Load order matters, especially if any mods affect the same files or areas. Typically you’ll want the Fixer mod and other frameworks at the top.
Checking the Load Order serves as a way to verify all your mods are properly enabled and ready to go. If anything is missing here, it likely didn’t install right.
The other thing I’d suggest doing is clicking the “Deploy” button in the top toolbar area of the Mods section. It has a little chain icon.
Deploying queues up your enabled mods to fully install any files or changes into the game folder. You’ll likely get a Windows prompt asking for admin permission – allow this to happen.
Step 5: Launch the Game!
Okay, now the exciting part – you can finally load up Baldur’s Gate 3 and check out your shiny new mods!
At this point you have two options for launching the game:
- Through Vortex: In the Tools section of Vortex’s left sidebar, find Baldur’s Gate 3’s play button under the Game Tools heading. Click it to launch the game.
- Normally through Steam/GOG: Launch the game as you usually would, through the Steam library or GOG Galaxy.
The main advantage of launching through Vortex is convenience, plus it guarantees the correct patch version loads.
However, if you do launch via Vortex, one quick thing to check first – mouse over the BG3 tool and click the three dots icon on the far right side.
Go to Edit Tool, and check that the Target path is set to launch either the Vulkan or DX11 version, whichever you normally use via the game’s own launcher.
For me, it kept defaulting to Vulkan even though I play in DX11. So I had to manually update the target path to bg3_dx11.exe instead.
Once set, go ahead and click the Launch button! Assuming all went well, your mods should now be active in Baldur’s Gate 3 for your testing and adventuring enjoyment!
Disable or Uninstall Mods
Now that you’re all set up for modding Baldur’s Gate 3, let’s quickly go over how to disable or uninstall mods using Vortex.
To temporarily disable a mod you have installed, find it under the Mods section, and simply uncheck the “Enabled” box on the right side. This greys it out and excludes it from the load order.
To fully delete and remove a mod, mouse over it in your Mods list, and you’ll a little arrow icon appear on the right side. Click this arrow next to the Enable/Disable checkbox.
A menu will open up with the options to completely uninstall the mod, or purge it which is a more thorough removal. Select uninstall.
This will delete all the mod’s files from your BG3 install. You’ll then need to re-deploy your mods from the toolbar afterwards.
And that’s it! Rinse and repeat to add, arrange, uninstall, and manage your mod library as it grows.
Do not forget to checkout the most common BG3 mistakes.
Tips and Tricks for Smooth Modding
To wrap things up, I wanted to share some tips and tricks I’ve learned to help your modding experience go smoothly:
- Carefully read the full mod description page and any instructions – Some mods cannot or should not be uninstalled mid-playthrough, while others are designed for easy removal. The mod page will provide guidance.
- If enabled mods don’t show in the Load Order, try fully closing and reopening Vortex. Then click “Deploy” in the Mods toolbar afterwards to refresh things.
- Check and install any required dependencies for complex mods – You’ll see these listed in the Requirements section or description. Other mods may need certain frameworks to function that you need to add first.
- I’d suggest starting simple – Install just 1 or 2 easy, cosmetic mods like hair or character creation options at first to confirm things are working before diving headfirst into larger overhaul mods.
- For any mods marked as replacers, choose to install as a replacer when prompted or you’ll have to manually overwrite files later. Replacers permanently replace game files so be cautious.
- Make backups of original game files before installing replacer mods so you can restore things if desired later on down the road.
And that covers the full process of how to install, manage, and mod Baldur’s Gate 3 using Vortex!