
GLFW Error 65542 is a standard error that appears while using the Minecraft Java addition. If you face this error while trying to launch Minecraft, follow the steps given below to fix it quickly. This error occurs when there arises a problem with OpenGL API. For starters, OpenGL API is an interface your computer uses to render graphics, including 2D and 3D.
Minecraft GLFW Error 65542 (Driver Does Not Support OpenGL) error is super annoying, but the good news is that it is easy to fix. Most of the time, outdated graphics drivers or conflict with other drivers installed on your computer might be the reason. Anyways, we will mention all possible ways to fix Minecraft GLFW Error 65542, right in this article.
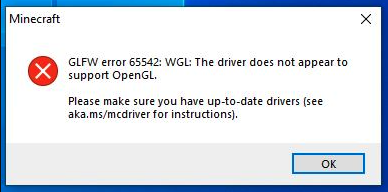
Here’s how the error message looks like on your device:
GLW error 65542: WGL: The driver does not appear to be support OpenGL.
Please make sure you have up-to-date drivers(see URL for instructions).
How to Fix GLFW Error 65542 in Minecraft?
Most of the time, manually copying the OpenGL.DLL should fix the issue. But that doesn’t mean it will fix the problem always. Make sure to follow all the methods given below one by one to find the working solution for you.
Before going in, make sure that you have performed basic actions like:
- Restarting Windows computer
- Quitting Minecraft and all related services and relaunching the same.
- Check for updates
If none of them helped you in the first place, then follow the guide below.
Method 1: Add OpenGL.DLL file Manually
Did you know that sometimes adding the OpenGL.DLL file to the installation directory will solve the issue on its own. Sometimes you might have knowingly or unknowingly deleted the OpenGL32.DLL or OpenGL64.DLL file from your computer.
First, let’s start with the easiest method of all. It is as simple as downloading the .DLL file from the link given and copying it to the installation directory.
You have to download and copy the DLL file to the Java and JRE folder.
Step 1: First, click on the link given below to download the Minecraft OpenGL DLL file.
The download file will be in .ZIP format. You will have to extract the file to get your hands on the DLL file.
Step 2: The folder will contain both 64-bit version and 32-bit version of the DLL file. Depending on the OS architecture, you have to select the particular DLL file. Once found, right-click on the file and click on Copy.
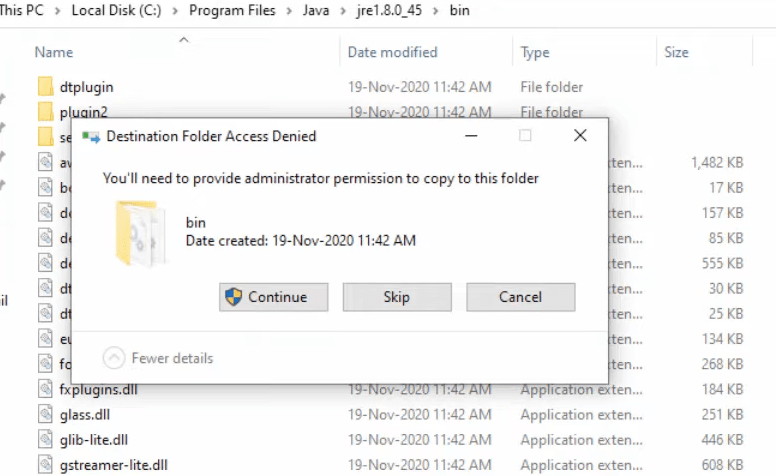
Step 3: Once copied, navigate to the below-given location and Paste it there. Just open the Windows File Explorer and then paste the address in the address bar and hit enter. Make sure to edit the JRE version with your JRE version.
C:\Program Files\Java*JRE Version*\bin
As you modify content inside the Windows installation directory, a pop-up might appear asking you to confirm your action. Just click on the Yes button, and you are all good to go.
After doing all the steps mentioned above, relaunch Minecraft and see if the error is fixed. At times, you might also want to try restarting your computer before trying to launch Minecraft.
This is how we fix the OpenGL error in Minecraft by manually copying .DLL file to the Java installation directory. If this method didn’t fix the issue for you, then try other methods given below.
If you frequently face Minecraft connection timed out error while launching Minecraft then follow these steps.
Method 2: Reinstall Graphics Driver
Sometimes reinstalling the graphics driver might help you in fixing this particular Minecraft error. So all you have to do is go to Device Manager and see if there is any pending update available. If yes, go ahead and update the same.
If you’re not sure how to update the graphics driver, follow the steps given below.
Click on the Start button and search for Device Manager. From the list that appeared, open Device Manager
From the Device Manager window, select Display Adapters. It will show you the graphics card installed on your computer. All you have to do is just right-click on the graphics card and click on the Update driver button.
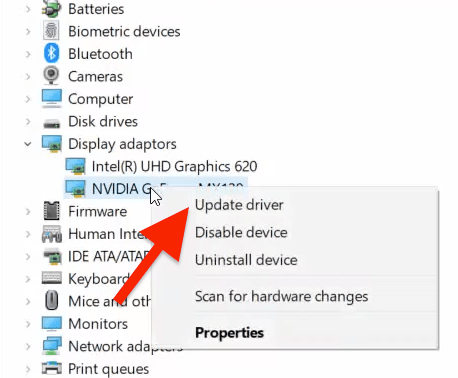
(As soon as you click on the Update driver button, Windows will check for the update online. So make sure that you have an active Internet connection while performing this step.)
If an update is not available, then you can try uninstalling and installing the Graphics driver. Visit your GPU Manufacturer website to download the official driver:
Method 3: Update Windows
If you are using an older version of Windows or have pending updates, there are some chances for errors like this to appear. It is recommended that you update Windows to the latest version to have a bug-free experience.
Most of the people might have disabled automatic Windows update. If this is the case, then we need to update Windows manually.
In the section, we will see how to update Windows to the latest version to fix OpenGL errors in Minecraft.
- Open Settings
- Click on Update & Security
- Make sure you are in the Windows Update tab. If any updates are available, you will find them under the Windows Update section.
- Just click on the Download button to start downloading the update. Once downloaded, install the same and restart your computer.

Minecraft OpenGL 65542 Error Solved
These are some of the working methods to fix Minecraft OpenGL 65542 Graphics-related errors. Make sure to follow all the steps given in the article to resolve the same quickly. Most of the time, this error occurs when people knowingly or unknowingly delete the OpenGL.DLL file, or the file gets corrupted.