
So you connected your smartphonecomputeruter to a Wi-Fi network, and it says Wi-Fi connected but no Internet access. You open a web browser or any other app, and you’ll see no content loading.
WiFi connected but no Internet access is a common problem these days and can be easily fixed in less than five minutes. There are a couple of reasons why it shows a Wi-Fi connected but no Internet access error message.
Last day, I connected one of my smartphone to my friend’s Wi-Fi network and saw this error message pop up. Since I already knew what to do, I fixed it in less than two minutes.
Follow the guide below to fix Wi-Fi connected but no Internet access error quickly.
In this article, you will find all the steps that I used to get the problem solved + some other fixes that many people tried and worked. All you have to do is go through the article and try the instructions mentioned below.
If a step doesn’t get it right for you, you can move to the second.
Fix Connected But No Internet Access Error
I will share multiple methods below. Since we don’t know what exactly is wrong, so you are suggested to go through the list one by one and try all the troubleshooting hacks given below.
At some point in time, things should start working. Even after trying all the troubleshooting tips mentioned below, you are getting the same error, and I suggest you contact your Internet Service Provider.
The triangle exclamation mark on the Network icon in the Windows Taskbar indicates that you are connected to a network with no Internet Access.
Try Connecting Other Devices
The very first thing that we want to know is whether the problem is with our computer or the problem is with other devices, too. If you connect your computer to the Internet via WiFi, try connecting your smartphone to the same WiFi Network and see if you can access the Internet.
In Android, you will see a message (Connected(no internet)) with an X mark and on iPhone, you will get a message (No Internet Connection) just below the particular WiFi Network.
You can also try connecting your other computer/Laptop and see if the problem persists. If you are using a LAN Internet connection, then connect the LAN ethernet cable to your laptop or any other device with en ethernet port and see if you have Internet access.
At this point, if you can get Internet access on other devices,, then the problem may be some misconfiguration with your computer/laptop. If you cannot get Internet Access even after trying different devices, then the problem is more likely with your network equipment (Modem/Router).
Reboot Device
Let’s start with restarting your computer/laptop or smartphone. A recent software/hardware change can result in misconfiguration or wrong settings. This might temporarily make the Internet service to go down.
When you install new software to your computer, it might conflict the network settings, and a restart might be essential to restore the network. VMWare Virtual Box is an example of this.
If the problem is sudden from nowhere, it is more likely because of a pending restart/software change. Just Restart your device and see if you can get Internet access. If you cannot get Internet access even after restarting the computer, then move to other steps.
Modem/Router Reboot
A modem or router reboot might be able to restore internet access. You restarted your device to see if there were some pending installations/change there. Similarly, you can also restart your modem or WiFi router to solve the issue. Most of the time, a simple modem reboot can solve all the problems in no time.
There will be a physical switch in your modem that can be used to restart your modem. You can see the switch to the backside of your modem/router. In some routers, you are required to press the reboot button once; in some other routers, you might want to click and hold the button for a couple of seconds.
Similarly, if you cannot find the button, unplug the modem, leave it there for a few minutes, and then connect it back to the network, and it should be okay.
Windows Network Troubleshooter
Windows already has a Network Troubleshooter which can help you identify the problem. There may be several different reasons for why the error appears.
This is where troubleshooter comes in handy. It will help you find the problem by analyzing the network you are connected to and solve the problem.
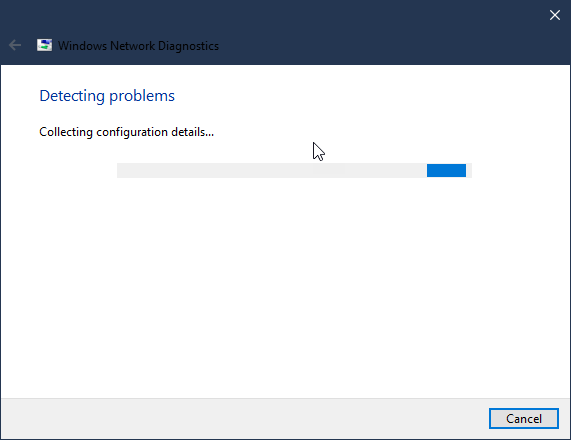
To access the Windows Internet Troubleshooter, right-click the ethernet/WiFi icon from the taskbar and select the option “Troubleshoot problems“.
Upon clicking, it will open the troubleshooter and wait for a few seconds until it finds the problem. It will show some problems, and you can directly search the web for the given issue.
A network troubleshooter should be available on macOS and Linux as well.
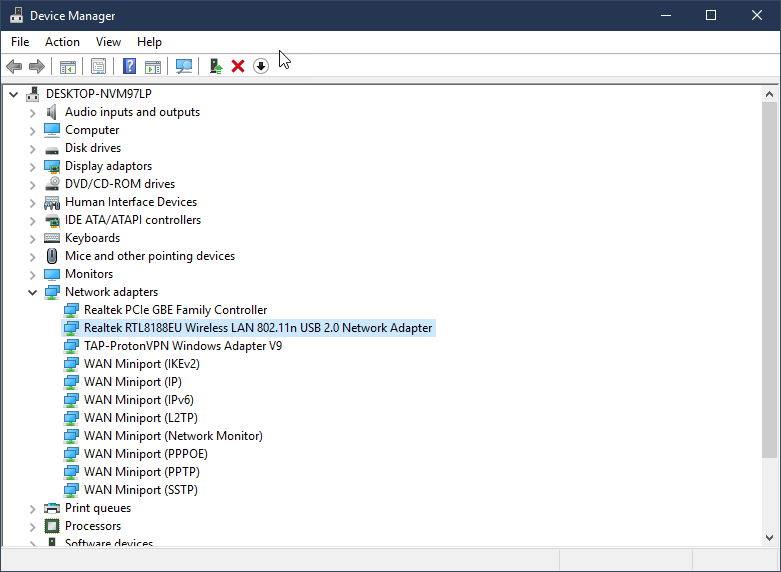
Internet Driver Fix
An outdated Network driver or misconfiguration in settings of WiFi/Internet driver can lead to similar problems.
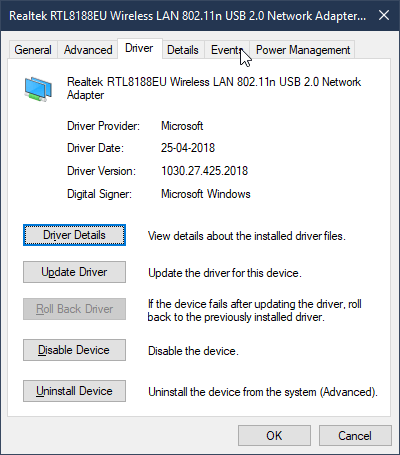
To fix this, you need update network driver to the latest version,, which will be more stable and bug-free than the earlier one. On Windows, click Windows Key + R to open Windows Run and then type in “devmgmt.msc“. It will open Windows Device Manager. From here, you need to find your Network Hardware Driver.
Click the option called “Network adapters” and then click on the Network adapter that you using to connect to the Internet. For example, if you are using WiFi then select the WiFi Adapter settings and if you are using LAN Ethernet then select the LAN Driver.
(Connect to some other network via LAN/WIFi possible)
Right-click on the Network Adapter and then click Update Drivers and update the driver to the latest version to see the changes.
Flush DNS
The DNS Cache can sometimes create problems while visiting certain websites. Cache files aggregate over time and make the website and content loading slow. The easiest way to fix this issue is to flush or clear the DNS. It is very easy to flush DNS in Windows. All you have to do is follow the instructions mentioned below, and you are all good to go.
In Windows, you need to use Command Prompt to Flush DNS.
- Open Command Prompt
- Paste the below-given command and Hit Enter
ipconfig /flushdns
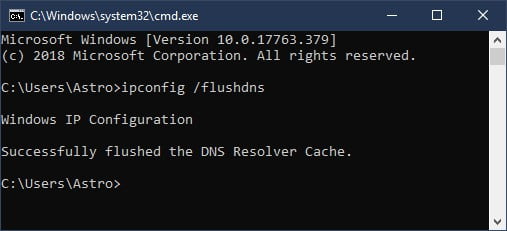
- All DNS Cache will be flushed instantly
Check for Network LED lights on Modem/Router
If the problem is something with your Internet Service Provider or the Internet connection then that can be identified by looking at your Modem. Almost all modems and routers these days come with some indicator LED showing the uptime and downtime status.
If everything is okay, the LED light should be turned ON continuously, or a green light should blink. If the LED light is blinking red or LED doesn’t light up under the “Internet” option, then there is something wrong with your internet connection, and there is absolutely nothing we can do. In this situation, call your ISP customer service and let them know about the issue.
You may use WiFi Analyzers for Windows to test WiFi networks and find the fastest one.
Set Automatic IP and DNS
Misconfiguration in adapter IP and DNS settings can cause IP conflicts, and websites won’t load.
To check if this is a problem with the IP/DNS values used by your device, you have to just open command prompt and ping a website address. If the host is unreachable or if you get a timeout response then the problem should be something with the DNS and IP values assigned.
Someone might have changed the IP address and DNS in the network adapter settings,, which might be causing the issue. To fix this, all you need to do is set the IP and DNS values to their default settings. Open Adapter settings and set them to obtain both the IP Address and DNS values automatically
To set automatic IP and DNS, follow the steps below.
- Open Network and Sharing Center
- Click on “Change Adapter Options“
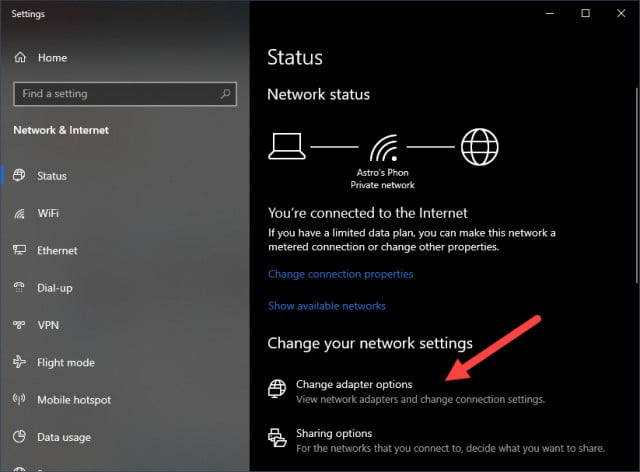
- Here you will see all the Network adapters present in your device. Right click on the one that you are using to access the Internet and select Properties.
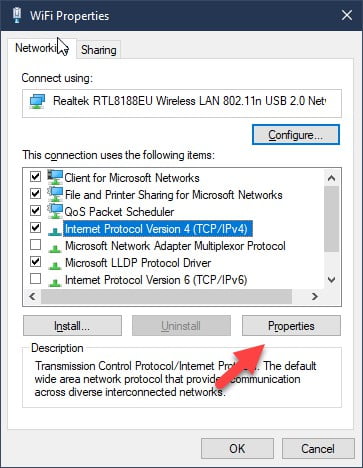
- From the pop-up that appears, select “Internet Protocol Version 4(TCP/IPv4)” and click on Properties.
- Ensure that both the options “Obtain an IP address automatically” and “Obtain DNS Server address automatically” are enabled.
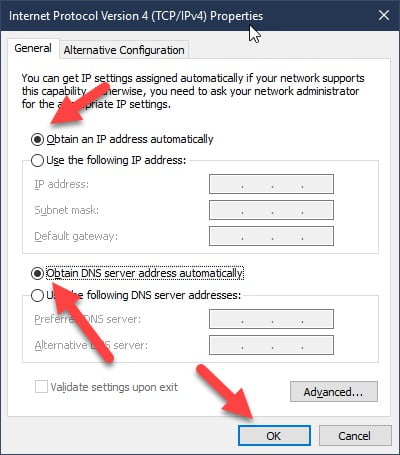
- Click OK
Now we have set up automatic IP and DNS.
You may use a DNS Benchmarking Tool to find the best DNS network that works well in your area.
Reset Network
A network reset will remove and reinstall all your network adapters and set other networking components back to their original settings. You might need to reinstall other networking software afterward, such as VPN client software or virtual switches.
Upon resetting the network, all the WiFi networks, SSID, and passwords will be removed, and you will be required to set up the connection again. You will have to go through the initial setup to set up your Internet using LAN or WifI.
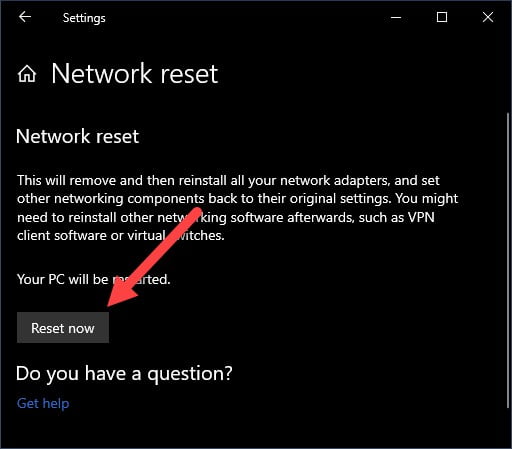
To reset network, you only want tok on the Windows button from taskbar and then type “Network Reset” in the search box and hit enter. Click the Reset Now button to quickly reset all the network configurations, and your PC will restart automatically after the process is done.
Wrapping Up
So these are some hacks you can try to fix the Connected But No Internet Access issue on your device. I have mentioned a couple of working tips and tricks above. You can go through them one by one and see if the problem gets fixed. After trying all these, you will have to contact your local ISP Customer Service and ask them for help. It will likely be a problem at their end, and we can’t do anything about that.