
Clearing or flushing DNS cache on our computer will delete all saved DNS lookup information. Clearing and resetting DNS Cache can help you in multiple ways. A corrupted or attacked DNS table on your device may cause it to open a malicious website instead of the website you requested.
Windows, macOS, and Linux come with the option to flush DNS. In this article, we will see how to reset and flush the DNS cache on Windows, macOS, and Linux. It is really simple and takes less than a minute or two to get it done.

Why Flush DNS Cache?
Every time you type a website address in the address bar and hit enter, the query is sent to a DNS server where it finds the IP address of that particular website. Only after finding the IP address, you will be able to visit the website.
To speed up the process, Windows, macOS, and Linux store the IP address of the website you have visited in the past. This way, it will help to reduce lookup time and access the website easily and fast. But, if a website’s IP was recently changed, and you try to visit the website, it will return an error. This happens because the browser tries to access the website with the IP address which is saved on the computer itself.
The DNS Cache contains information like Resource Data, Record type, Record name, TTL, Resource Data Length, Class, etc.
Clearing DNS cache will remove all the IP address and their details from your computer, and will initiate a new lookup request to find the IP of the websites you want to visit.
You can use DNS Benchmarking Tools to benchmark the performance and resolving speed of the DNS that you are using as well as other DNS services on the market.
Now, let’s see how to flush DNS on Windows, Linux, and macOS.
How to Flush DNS in Windows
Follow the steps given below to flush DNS on a Windows computer. There are multiple ways to clear DNS cache on Windows, follow any method that you find easy.
Method 1: Reset DNS Resolver Cache – Windows Command
In this method, we will use the Windows Run command box to clear the DNS cache on our Windows computer. This is one of the easiest methods to follow if you don’t want to do it via CMD (Command Prompt).
The whole process is as easy as running a simple command.
Step 1: Press Win Key + R to bring up Windows Run command window. (If Win key is disabled on your computer then you may open Search and type CMD, from the list right click on Command Prompt and select the option “Run as Administrator“)
Step 2: Enter the below given command in the field and hit Enter
ipconfig /flushdns
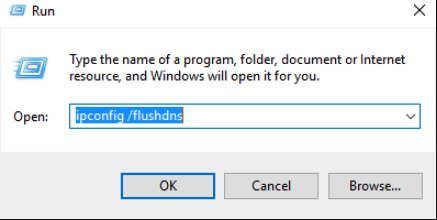
Soon after running the command, DNS Resolver Cache will be cleared.
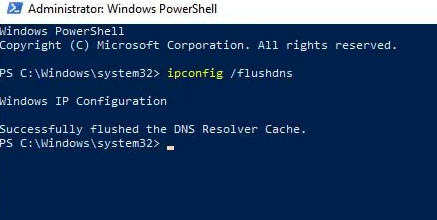
Method 2: Clear DNS Cache using Windows PowerShell
In this method, we are using Windows Powershell to clear DNS cache.
- Open Start and search for Windows PowerShell
- Find Windows PowerShell from the list that appeared and right-click on it. Now, select “Run as Administrator“
- Type the following command in the PowerShell window and hit enter
Clear-DnsClientCache
You have successfully cleared the DNS cache from Windows. It will work with all versions of Windows including Windows 11, Windows 10, Windows 8/7, etc.
You may also try clearing cache from Google Chrome as well. This will remove all the temporary files and caches being used by Google Chrome.
How to Clear DNS Cache on macOS
If you are a macOS user then follow the steps given below to clear DNS cache on macOS.
Step 1: Open Terminal. (You can search for Terminal on Spotlight or find it in the Applications folder or Launchpad)
Step 2: On the Terminal window, paste the below given command and hit enter.
sudo killall -HUP mDNSResponder

Step 3: Now, a popup will appear asking you to enter the administrator password. Just type the password and hit enter. DNS Cache will be removed from your Mac device.
The command to clear DNS cache on different versions of macOS might not be the same. Refer the section given below to find what command to use with your macOS’s version.
| macOS Version | Command to use |
|---|---|
| Mojave (version 10.14) | sudo killall -HUP mDNSResponder |
| High Sierra (version 10.13) | sudo killall -HUP mDNSResponder |
| Sierra (version 10.12) | sudo killall -HUP mDNSResponder |
| Mountain Lion (version 10.8) | sudo killall -HUP mDNSResponder |
| Lion (version 10.7) | sudo killall -HUP mDNSResponder |
| El Capitan (version 10.11) | sudo dscacheutil -flushcache sudo killall -HUP mDNSResponder |
| Mavericks (version 10.9) | sudo dscacheutil -flushcache sudo killall -HUP mDNSResponder |
| Yosemite (version 10.10) | sudo discoveryutil mdnsflushcache sudo discoveryutil udnsflushcaches |
| Snow Leopard (version 10.6) | sudo dscacheutil -flushcache |
| Leopard (version 10.5) | sudo dscacheutil -flushcache |
| Tiger (version 10.4) | lookupd -flushcache |
Flush DNS Cache in Linux
Now let’s discuss clearing DNS cache on Linux computers. When it comes to the Linux side of things, there are multiple Distros like Ubuntu, Mint Linux, etc. Depending on the Distro you use, the DNS service used will be different.
So, the first thing you need to do is to find the proper DNS service used by the Distro. NCSD, BIND, and dnsmsq are a few of them.
Clear Local NCSD DNS Cache
Use the below given command to clear DNS cache on NCSD based system.
sudo /etc/init.d/nscd restart
Flush Local BIND DNS Cache
Use the below-given commands to easily clear the DNS cache. During the process, you will be asked to enter the Administrative password as well.
sudo /etc/init.d/named restart
sudo rndc restart
sudo rndc restart
Flush Local dnsmsq DNS Cache
If you are using dnsmsq DNS, then use the below given command to clear DNS cache.
sudo /etc/init.d/dnsmasq restart
Use the command given above depending on the DNS you use and the DNS cache will be cleared. On some Linux Distros, it might ask you to enter the admin password as well. Just enter the password and you are all good to go.
Flush DNS Cache
This is how we flush DNS on Windows, macOS, and Linux. At times, we might want to flush DNS so as to replace all the cache entries with their updated values. If you are someone who is into making websites, networking, etc then you might want to use this option more frequently than others.
All you need is a simple piece of command and you are all good to go. All the commands for Windows, macOS, and Linux are given above. Select the appropriate command based on your device and you are all good to go.