
Virtualization is one such useful feature available on all modern-day computers to let us install an OS virtually inside of Windows 10. If you would like to virtually run other operating systems like Linux, macOS, or Android on Windows 10 then you will have to enable virtualization on Windows.
Not just for installing other operating systems, you will need virtualization enabled on your computer if you want to use Android Emulators or iOS emulators like Bluestacks or Droid4X. In this article, we will see how to enable virtualization on Windows 10 and every other detail you should know about Virtualization.

Before going in, let me briefly explain a bit about Virtualization.
What is Virtualization on Windows?
Virtualization is a CPU-centric feature that will let you virtually partition a CPU and then use them to run other virtual machines. You can use software like VMWare or VirtualBox to run OS inside a virtual environment. Since it is a hardware feature, not all computers will have this enabled. But all modern-day computers do come with the option for virtualization.
Virtualization is available on both Intel and AMD based computers. So, let’s see how to enable virtualization on Windows.
Check if Your Computer Supports Virtualization
The first thing we want to make sure of is to know whether our computer supports CPU virtualization or not. It is very simple to check and you can use CMD to know about the same.
- First of all, open CMD (Command Prompt) or Powershell
- Now type the following command given below and hit enter.
systeminfo.exe
This command will list out important details regarding the computer including Hyper V Requirements. It basically tell us whether the computer supports virtualization or not.
- Scroll down a little bit and look for the Hyper V Requirements section
- If it shows like the image given below then it means your device supports virtualization.

You may also use some tools to see if virtualization is available or not. Both Intel and AMD come with a utility tool that will tell us whether our computer supports virtualization or not.
Just download the utility tool for your computer and check for the same:
These software will let us know if our computer comes with virtualization support
The next thing we need to do is to enable virtualization so that you can enjoy all the benefits offered by this option.
How to Enable Virtualization on Windows
Enabling Windows Virtualization might sound a bit tricky for a lot of people as you want to go to BIOS and edit a couple of settings there. But, it is super simple. Just follow the steps given below and you are all good to go. I will share a separate guide for both Intel-based and AMD-based machines.
Enable Virtualization on Intel CPU
If your computer is using an Intel CPU then follow the step-by-step guide given below to enable CPU virtualization on Windows 10.
Step 1: Restart your computer and enter into BIOS (The key to enter into BIOS will change depending on the motherboard that you are using. You can search online for the same. Doing a quick Google search “Motherboard model name + BIOS key” will let you find it).
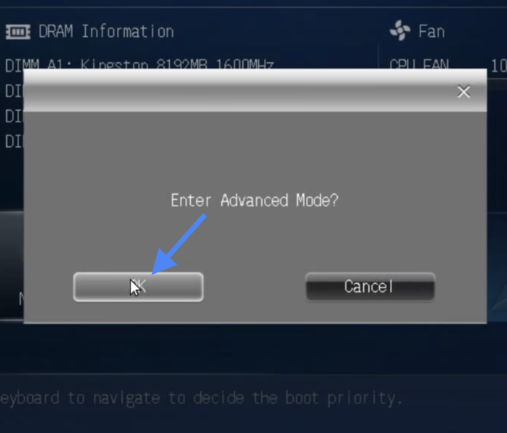
Step 2: Once you have entered BIOS settings, look for the Advanced settings button from the bottom section of the screen. Just click on the button. Now a pop up might appear and ask you if you want to enter Advanced mode, just click on Yes.
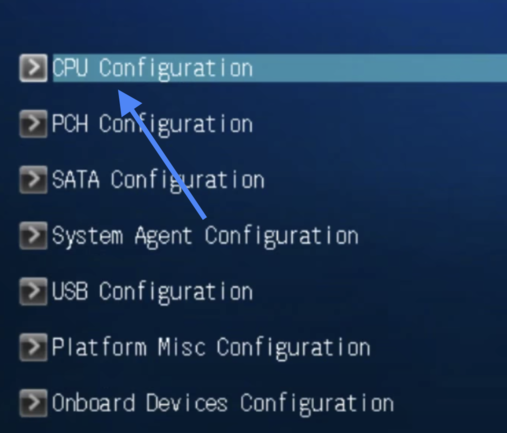
Step 3: Now from the top options section, switch to Advanced tab and click on CPU Configuration
Step 4: Under the CPU Configuration section, find the option called “Intel Virtualization Technology” and enable it.
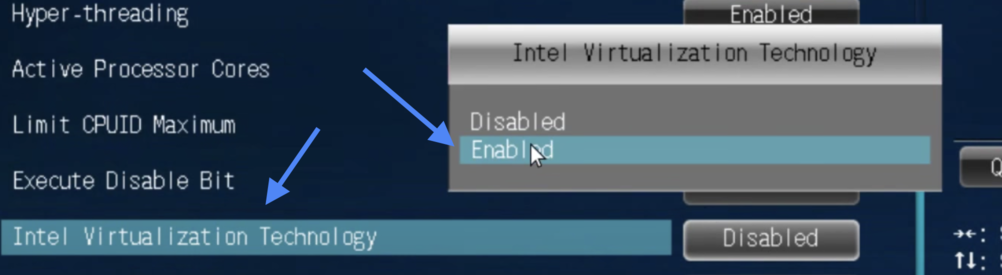
Depending on the motherboard you are using, the interface of BIOS and options might differ a little bit. If you are not able to find Intel Virtualization Technology, then look and see if you can find something like below:
- Intel VT-x
- Virtualization Extensions
- Intel Virtualization Technology
- Vanderpool
If you find any of these option, just enable it and you are good to go.
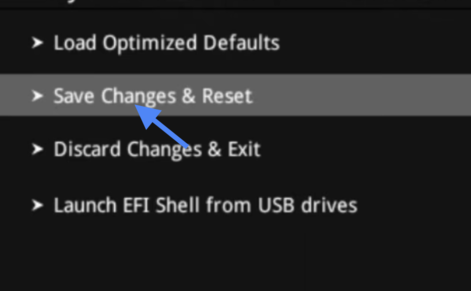
Step 5: Once enabled, click on the exit button and select Save changes and exit.
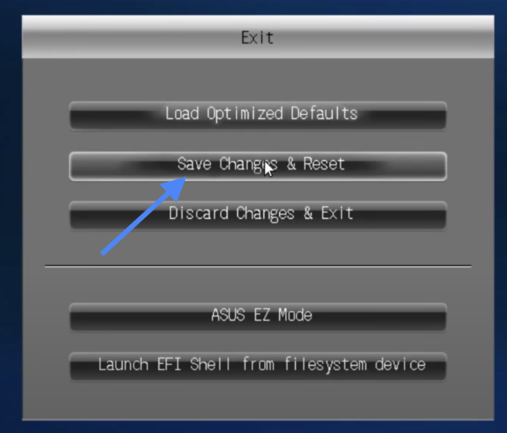
Now, you have successfully enabled virtualization on your Intel based computer.
Enable Virtualization on AMD Computers
If you are using an AMD-based computer, then here is the steps that you want to follow in order to enable virtualization.
Step 1: Restart your computer and get into BIOS (The key to enter into BIOS will change depending on the motherboard that you are using. You can search online for the same. Doing a quick Google search “Motherboard model name + BIOS key” will let you find it.)
Step 2: From the BIOS screen, click on the Advanced Mode button from the bottom section of the screen.

Step 3: Now move to Advanced tab and click on CPU Configuration

Step 4: Find an option called SVM Mode and enable it.

Depending on the motherboard you are using, the options and layout might differ a little bit. Here are some other options to look for if you are not able to find SVM Mode.
- AMD-V/SVM
- Virtualization Extensions
- Vanderpool
- AMD Virtualization Technology
If you find any of the options mentioned above, just go ahead and enable the same.
Step 5: Once enabled, click on the Exit button and select the Save Changes and Exit button to quite BIOS and boot back into Windows 10.
How to Enter BIOS & Enable Virtualization on Different Computers?
If you are not sure which key to use to enter BIOS settings, then you might find it below.
For ASUS:
BIO Key – F2
Steps to Turn on Virtualization on ASUS Computers/Motherboard
- Press the F2 key during the boot up to enter into BIOS
- Switch to Advanced tab and select Virtualization Technology. Now, simply enable the option
- Once enabled, press the F10 key to save changes and exit BIOS
For Acer:
BIOS Key: F2/Delete
Steps to Turn on Virtualization on Acer Computers/Motherboard
- Press F2/Delete key to enter into BIOS during the bootup time
- Navigate to the System Configuration tab
- Under the System Configuration tab, you will find an option called Virtualization Technology and enable the option
- Press the F10 button to save all the changes and exit BIOS. Now boot back to Windows and Virtualization has been enabled on your Acer computer
For HP:
BIOS Key: F10/Esc
Steps to Turn on Virtualization on HP Computers/Motherboard
- Press F10 or Esc key to enter into BIOS
- Go to the System Configuration section and select Virtualization Technology
- Enable the option and then press F10 key to save changes and exit
- Reboot to Windows and Virtualization has been enabled
For Lenovo:
BIOS Key: F1/F2
Steps to Turn on Virtualization on Lenovo Computers/Motherboard
- Use the BIOS keys mentioned above to enter into BIOS on Lenovo computer
- Under the Security tab, find the Virtualization tab
- Under Virtualization, select Intel(R) Virtualization Technology and enable it
- Press F10 to save the changes and exit BIOS
For Dell:
BIOS Key: F2
Steps to Turn on Virtualization on DELL Computers/Motherboard
- Enter BIOS by pressing F2 while on the DELL logo screen
- Select Virtualization under the Advanced tab and enable it
- Once enabled, press F10 to save changes and quit BIOS
- Now restart the computer and we have successfully enabled Virtualization on a Dell-based computer.
Final Words
This is how we enable Virtualization on Windows computers with Intel or AMD CPU. Almost all leading Intel and AMD-based computers come with Virtualization technology. Since it is a hardware feature, in order to enable the same, we are required to go to BIOS settings. Some people might find it hard to go to BIOS and enable Virtualization technology but it is super simple and can be done in less than 4 minutes or so.